
Leaving a 3D printer running unattended overnight or during long 20-hour print jobs presents a serious safety risk. If a thermistor detaches or a MOSFET fails closed, thermal runaway can cause permanent damage to your hotend or even start a fire. Furthermore, leaving the power supply, mainboard cooling fans, and stepper drivers powered on hours after a print finishes wastes energy and degrades hardware components.
By pairing OctoPi (OctoPrint on Raspberry Pi) with a Tasmota Smart Plug or ESP8266 Optocoupler Relay Module, you can implement automated power management, remote web toggle, and instant emergency thermal cutoff directly from your OctoPrint web dashboard!
Download OctoPi Tasmota Payload & Circuit Schematics
Access raw octoprint_tasmota_config.json payloads, KiCAD circuit schematics, and REST API scripts directly on GitHub:
⭐ View Repository on GitHub (shahzad15/3DPrinterMods-OctoPi-Tasmota-Relay-Control) →

Shop Raspberry Pi 4 Deal →

Shop WEMOS Deal →

Shop Mainboard Deal →
📸 1. Photorealistic Hardware Prototype & KiCAD EDA Circuit Schematic
To safely isolate your OctoPi Raspberry Pi 3.3V GPIO header from high-voltage AC 110V/220V mains, use an Optocoupler PC817 Isolated 5V Relay Module or a Wi-Fi Tasmota Smart Plug (Sonoff S26 / Gosund UP111 flashed with Tasmota firmware):
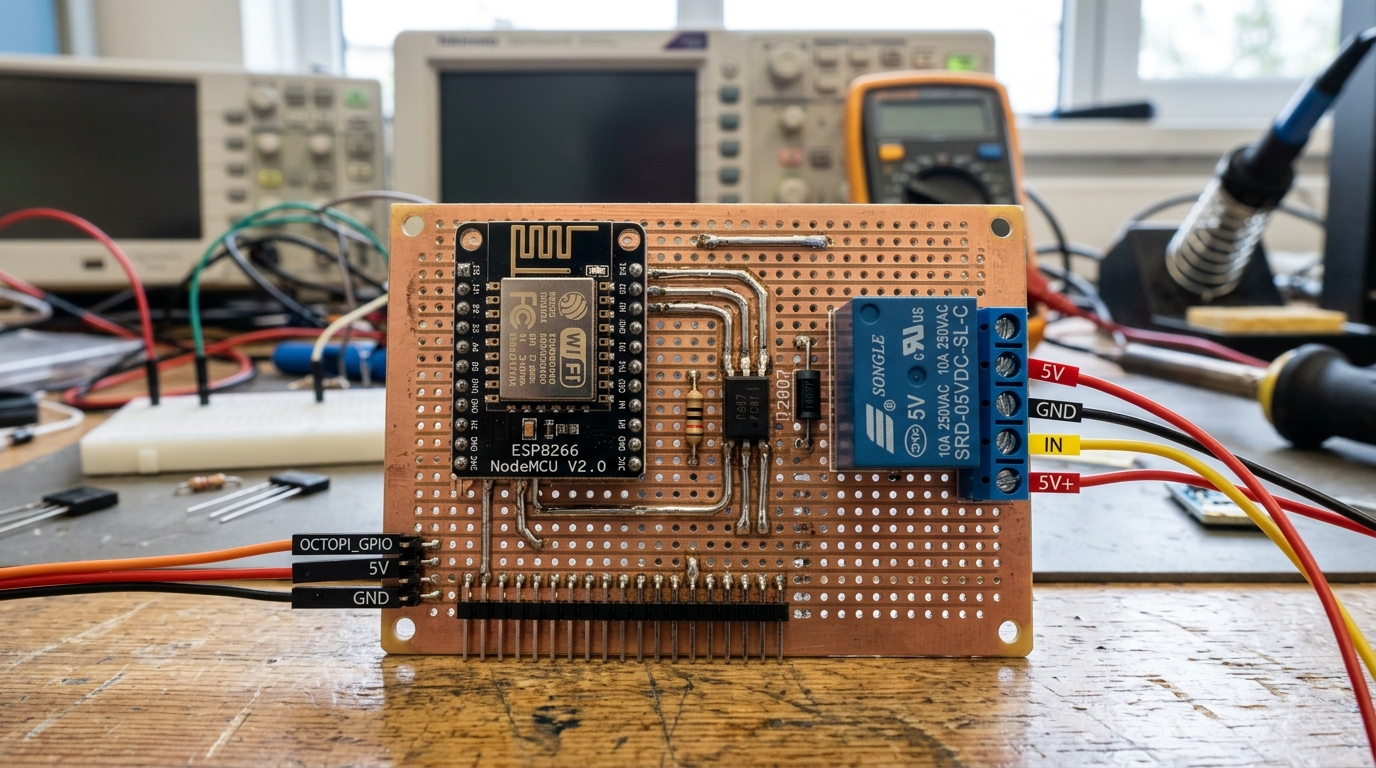
Realistic Hardware Prototype: Soldered Copper Vero Board Module featuring NodeMCU ESP8266, PC817 Optocoupler IC, 1N4007 Diode & Songle 5V Relay Module
KiCAD EDA Engineering Circuit Schematic:
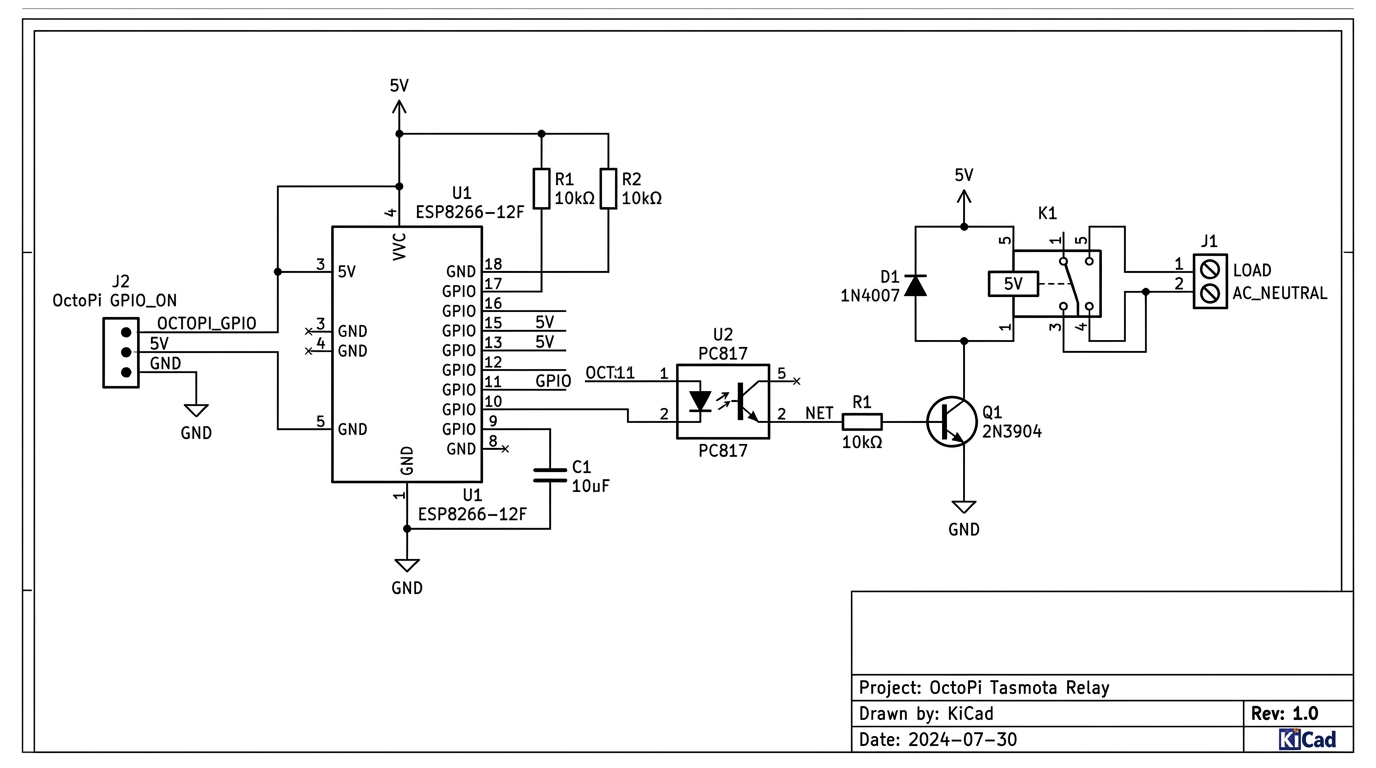
EDA CAD Schematic Diagram: ESP8266-12F MCU (U1), PC817 Optocoupler (U2), 2N3904 Drive Transistor (Q1), 1N4007 Flyback Diode (D1), and 5V Relay (K1)
🌐 2. Tasmota HTTP REST API Commands
Tasmota microcontrollers accept instant HTTP commands over your local network. You can control the power supply state from terminal scripts or curl commands:
# Command 1: Turn ON Printer Power Supply
curl -s "http://192.168.1.150/cm?cmnd=Power%20ON"

# Command 2: Turn OFF Printer Power Supply
curl -s "http://192.168.1.150/cm?cmnd=Power%20OFF"

# Command 3: Query Power State Status (Returns JSON: {"POWER":"ON"})
curl -s "http://192.168.1.150/cm?cmnd=Power"
🔌 3. Configuring the OctoPrint Tasmota Plugin
Integrate Tasmota directly into your OctoPrint web interface in 3 simple steps:
- Open OctoPrint Web Interface -> Settings -> Plugin Manager -> Search for OctoPrint-Tasmota and click Install.
- Navigate to Tasmota Plugin Settings -> Add a new Device:
- IP Address:
192.168.1.150 - Title:
3D Printer Main PSU - Auto Connect to Printer on Power ON: Enabled (Delay 5 seconds).
- Auto Power Off after Print Finish: Enabled (Delay 10 minutes).
- IP Address:
- Click Save—a thunderbolt power icon will now appear in your OctoPrint top navbar!
🔥 4. Emergency Thermal Cutoff & Auto Off G-Code (M81)
To ensure total safety against thermal runaway fires, configure OctoPrint to automatically cut AC mains power if hotend temperature exceeds safety limits:
Add to Cura / PrusaSlicer End G-Code:
; End of Print G-Code Sequence
M104 S0 ; Turn off hotend heater
M140 S0 ; Turn off bed heater
G91 ; Relative positioning
G1 Z10 F600 ; Raise nozzle 10mm
G28 X0 Y0 ; Home X and Y axes
M84 ; Disable stepper motors
M81 192.168.1.150 ; Send M81 PSU shutdown signal to OctoPrint Tasmota plugin!
If OctoPrint detects hotend temperature exceeding 300°C or thermistor disconnect errors during printing, the Tasmota plugin instantly cuts the AC power relay, extinguishing heater current before thermal runaway occurs!
🏆 Summary & Recommended Setup
Automating your 3D printer’s AC power supply with OctoPi and Tasmota Smart Plugs or Optocoupler Relays provides complete peace of mind. Your printer powers up on demand when starting a job, shuts down cleanly 10 minutes after cooling down, and protects your workshop against emergency overheating!