
Updating 3D printer firmware or unbricking a corrupt bootloader on a mainboard inside an enclosure usually requires plugging physical USB cables or connecting 5 GPIO wires directly to a Raspberry Pi. But what if you could flash your BigTreeTech mainboard completely wirelessly over Wi-Fi without opening your printer frame?
By using a cheap $3 ESP32 / WEMOS D1 Mini Development Board (ESP32-WROOM-32, NodeMCU, or Wemos D1 Mini V4.0.0 Type-C), you can convert your 3D printer motherboard’s 5-pin SWD (Serial Wire Debug) header into a Wireless Remote SWD Flasher with a built-in drag-and-drop web browser portal!
Download ESP32 SWD Source Code & Pre-compiled Binaries
Access raw main.py, PlatformIO configs, partition tables, and pre-compiled ESP8266/ESP32 binaries directly on GitHub:
⭐ View Repository on GitHub (shahzad15/3DPrinterMods-ESP-Wireless-SWD) →

Shop BTT Mainboard Deal →

Shop WEMOS D1 Mini Deal →
📡 1. System Architecture & How Wireless SWD Works
Unlike physical debug probes, an ESP32 / ESP8266 module acts as a hardware bridge. It connects wirelessly to your local 2.4GHz Wi-Fi network while translating web commands into physical SWD clock and data pulses for ARM Cortex microcontrollers (STM32G0B1RE, STM32H723, STM32F4):
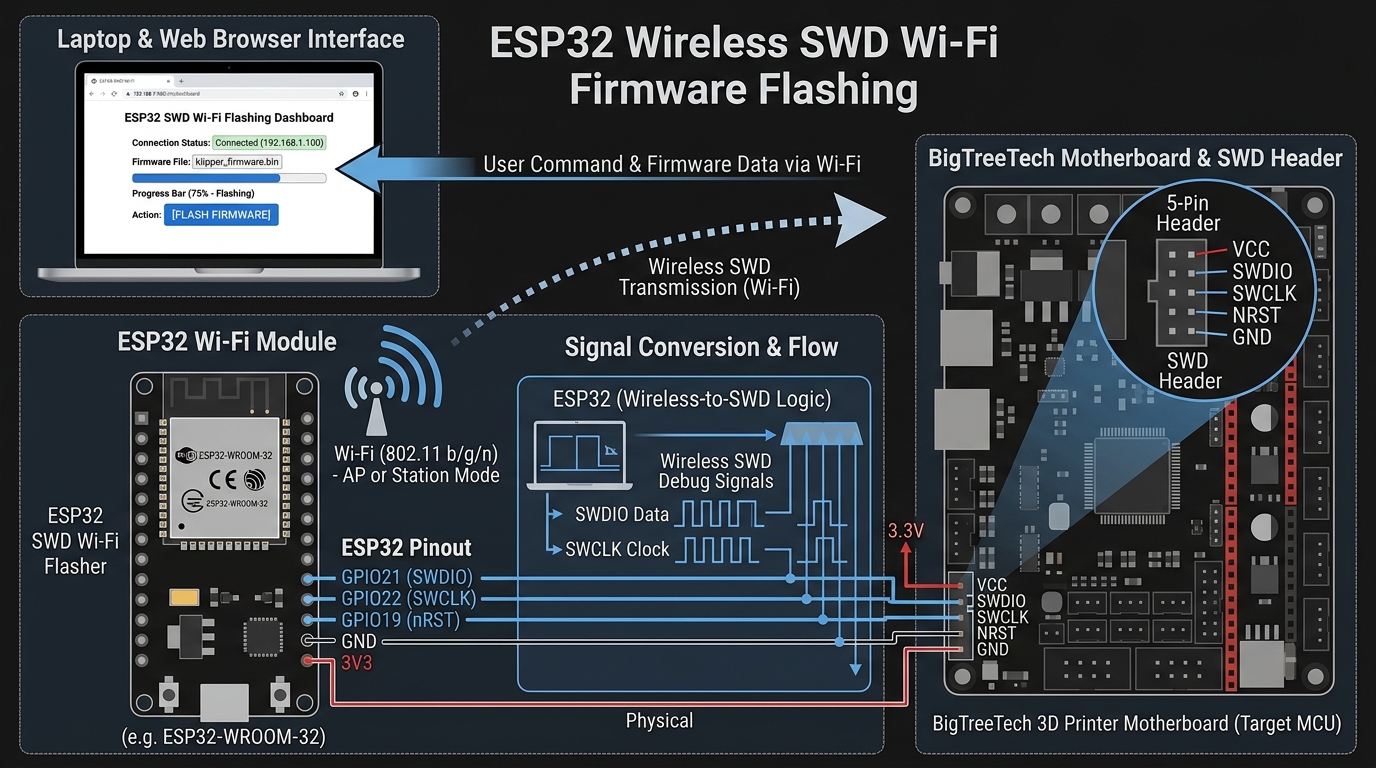
System Architecture: ESP32 Wi-Fi SWD Bridge converting browser drag-and-drop firmware uploads into wireless SWD debug signals
🔌 2. ESP Pinout & Wiring to BTT Motherboard Header
Connect 5 Dupont jumper wires between the ESP module and the BigTreeTech SWD header inside your printer enclosure:
⚡ 3. Flashing the Wireless SWD Firmware
Flash your ESP module with the open-source ESP-SWD or Blackmagic-ESP32 firmware using Esptool or Web Serial Flasher:
# Install esptool CLI
pip install esptool

# Flash ESP-SWD firmware binary to ESP32/ESP8266 at address 0x10000
esptool.py --chip esp32 --port /dev/ttyUSB0 --baud 921600 write_flash 0x10000 esp32_swd_firmware.bin
🌐 4. Drag-and-Drop Web Portal & Remote GDB Debugging
Once booted, the ESP connects to your local Wi-Fi router and opens two interface modes:
Method A: Web Browser Portal (http://192.168.1.100)
- Open your laptop or smartphone web browser and enter the ESP IP address.
- Drag and drop your
bootloader.bin,marlin.bin, orklipper.binfile directly into the web uploader. - Click FLASH FIRMWARE—the ESP erases the target chip sector, writes the binary over SWD, and performs an automatic hardware reset!
Method B: Remote Network GDB (Port 2331)
For advanced developers, the ESP exposes a remote GDB network socket. Connect GDB wirelessly over Wi-Fi:
# Connect GDB directly to ESP over Wi-Fi
arm-none-eabi-gdb firmware.elf
(gdb) target remote 192.168.1.100:2331
(gdb) monitor reset halt
(gdb) load
(gdb) monitor reset run
🏆 Summary & Recommended Setup
Whether using 5-wire Raspberry Pi GPIO bitbang for emergency unbricking or a WEMOS D1 Mini V4.0.0 Type-C / ESP32 Wi-Fi module for convenient wireless SWD flashing, SWD is by far the most reliable, robust method for managing BigTreeTech ARM Cortex 3D printer motherboards!